Ensaymada are soft, fluffy, lightly sweetened Filipino coiled brioche bread rolls topped with butter, sugar, and grated cheese. They are also referred too as pastries.
This Ensaymada recipe is easy but requires some time to make. The dough is set aside to rest and rise for a few hours before baking.

The Philippines was colonized by Spain for over 300 years, with that said, we have adapted many Spanish cuisine. One of these is "Ensaymada" or "Ensaimada," as they call it, which originated in Mallorca, Spain. Over time, we came up with our own adaptation by topping it with butter, sugar, and cheese.
These sweet bread rolls are well loved by Filipinos and mostly eaten as snack. They are sold in most bakeries in the Philippines. Some are rich and fluffy with buttercream and cheese while others are less buttery with drier consistency and texture.
In 2005, I had an inkling to make it but can’t find the recipes my mom had send me over the years. I was determined and googled it. There was one recipe at that time from a Hawaiian–Asian newsletter.
I made it many times but the recipe was not foolproof. I tweaked the measurements but was not successful. The 1st and 2nd time I made it, I ate the rolls.

In my hopes of getting it right, I was making it every weekend and if the texture was not right, it ended up in the trash can. It was wasteful but the ingredients were cheap anyway. Then, I finally gave up and hoped to find my mom’s recipe.
Ingredients and tips
One thing I love about this recipe is that it uses basic ingredients.
Another reason to love this ensaymada recipe is that you can use the same dough recipe to make cinnabon or cinnamon rolls. You can make them at the same time. How awesome is that!
- Yeast – Make sure to check that it is not expired.
- All-purpose flour – Spoon, level, and sift. Please don’t dunk your measuring cup in the flour bag. You will end up with a very dense mixture.
- Egg yolk – Room temperature.
- Butter – Soften at room temperature.
- Milk – Use whole milk.
- Granulated Sugar and Powdered Sugar – You can control the amount of buttercream or sugar topping.
- Grated Cheese – To make special Ensaymada, it is common to use Queso De Bola in the Philippines. Use gouda, edam, cheddar, or your favorite cheese. You can use packaged shredded cheese, but I prefer to use freshly grated cheese. Over the years, my love for Queso de bola has changed. I don’t know if it’s the cheese or my taste buds have changed. I replaced it with Rembrandt Extra Aged Gouda from Costco, which has been discontinued. I was so disappointed. Finally, I found another one to replace it, Beemster Premium Dutch Cheese – Black Label Gouda. Both cheeses are made in Holland. I am a huge cheese lover and I usually eat as a snack.
- Salt
Activating the yeast
As much as possible, don’t use expired yeast unless it was stored in the freezer. Yeast is use as leavening to make dough rise.
I prefer to use a packet (2 ¼ teaspoons) of Dry Active Yeast. Yeast is mixed with lukewarm water and sugar, set aside for 10 minutes to activate it. Water temperature should be 110 - 115 degrees F.

Place water in the microwave for 10 seconds then 5 seconds increments for about 15 to 20 seconds. It should be warm to touch that doesn’t burn your finger.
Note: If liquid is TOO HOT, it will kill the yeast.
You can use instant rapid yeast and add it directly to ingredients, but make sure it is not expired.
The benefit of using active-dry yeast is that by blooming it in lukewarm water, you can tell if it is alive. If you add rapid instant yeast to your ingredients, there is no way to know if it is alive. If not, you just wasted all the ingredients.
Where to rest and rise dough
Do this before you start making your dough. This suggestion does not apply to everyone and optional.
If your house has centralized a/c or it is cold in your house, the best place to rest and rise dough is in the oven with the door shut. Fill a medium pot with water halfway full and boil.
At the same time, set oven to its lowest temperature of 170 degrees F for 4 minutes. When done, place the uncovered pot of boiling water in the oven. This will create a warm temperature for your dough to rise.
Otherwise, the dough can stay at room temperature in a warmer area in your house covered with cloth.
Making the ensaymada dough
When yeast is ready, combine bloomed yeast, egg yolk, sugar, salt, butter, and ½ cup of milk in a stand mixer with a whisk attachment at lower speed (#2 KitchenAid) for about 2 minutes.

Change the whisk to the dough hook attachment. Add flour in 3 batches and the remaining milk. While adding flour, set speed to low (#2), then adjust to medium (#4 - #6). Every time you add flour, scrape the sides and bottom of the mixer. This process takes about 5 minutes. Do not overwork the dough.
The dough will get very sticky. It will slightly pull away from the side of the mixer but still be sticky, with some dough sticking at the bottom of the mixer.
Once the flour is fully incorporated into the mixture, lightly flour the spatula and your hands, and detach the dough from the mixer. Flip the mixer bowl upside down until the dough falls. Form the dough into a ball and transfer it to a floured or greased bowl covered with a cloth. Place it at room temperature or in the oven. If placed in the oven, there's no need to cover the bowl.

Proof or prove the dough for 1 ½ - 2 hours or until the dough has doubled in size. Look through your oven glass door and see the dough rising quickly. If yeast is active and you have the dough in a warm place, you will not have any issues with rising it.
Like I said, it is easy to make ensaymada but proofing the dough takes a while.
(6) Once the dough has doubled in size, punch down the dough with your fist to deflate it, or it will release air on its own once you remove dough with a spatula from the bowl. Again, lightly flour the spatula, working area, rolling pin, cutter, and your hands.
Once the dough is on the working area, there's no need to knead. Sprinkle ½ teaspoon of flour on the dough surface for easy handling. Avoid adding too much flour to the dough. Shape it evenly into a log. Cut the dough into 3 pieces, then divide each piece into 6. This recipe yields 18 medium-sized ensaymada.
Note: You can use a kitchen scale, but I don’t. If it helps, use a ruler.
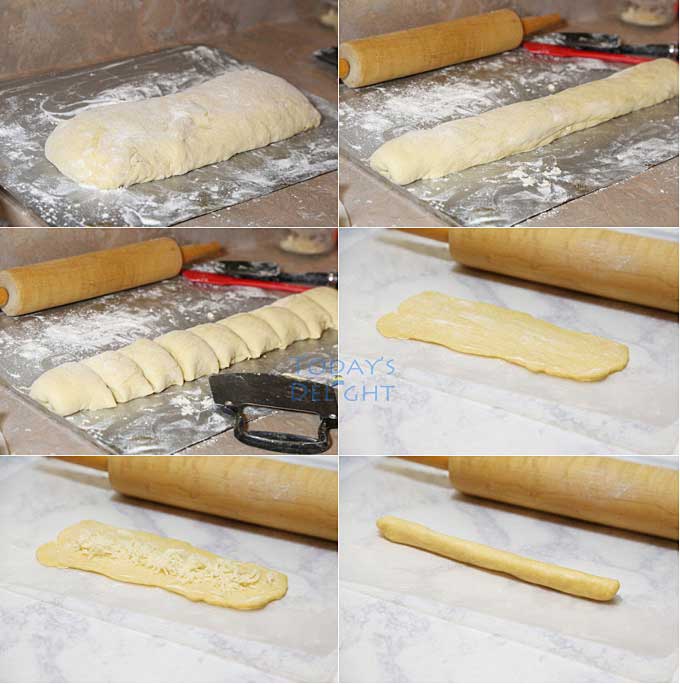
Using a floured rolling pin, flatten the dough with your hand and roll it out into a rectangle (8 inches x 4 inches). Lightly brush the surface with butter. Add grated cheese in the middle if you like, but it's optional. Make sure the cheese doesn’t stick out the edges as it will burn when baked.
Roll the dough into a log, then coil it, tucking the ends in the middle. Place it in a lightly greased mold. If using non-stick mold, there's no need to grease. If using a paper liner, grease it with butter.

Note: You can also use a baking pan and line up your ensaymada rolls with space in between.
Just like some commercial ensaymada, you don’t need to coil it. Form dough into a log, flatten it, brush surface with butter, roll it into a log, divide it into pieces, and place it in the mold or baking pan.

Ensaymada and cinnabon are made with the same dough recipe. Two different sweet bread rolls using the same dough recipe!
While coiling the dough, boil water in a pot and place it in the oven. Once all rolls are done, place the mold in the oven or at room temperature for 1 hour. It will rise a bit. For super soft and fluffy dough, it requires a total of 3 hours proofing the dough. Remove the mold from the oven.

It is easy to make ensaymada, but proofing the dough takes a while. As you can see in the image, I am baking ensaymada and cinnamon rolls side by side. Two sweet bread rolls in the same dough recipe.
Preheat the oven and bake at 350 degrees F for between 12 to 15 minutes or until golden.
As soon as you can, remove the rolls from the mold and transfer them to a wire rack to cool.


Applying topping
Brush the top of the ensaymada with softened butter, sprinkle some granulated white sugar, then top with cheese.
Another option is buttercream. Cream equal portions of softened butter and powdered sugar. Brush the top of the ensaymada with buttercream, then sprinkle with grated cheese.
Note: You don’t have to apply the topping right away. You can do it when you are ready to eat it.

Some tips
If you don’t own a stand mixer, knead the dough, but it will be very sticky. Flour your hands, but don’t add too much flour to the dough.
I have an 8-cup Cuisinart food processor, and I have used it to combine ingredients to make ONLY ½ of the recipe. It cannot handle the full recipe. Once combined, I knead the dough for a few minutes.
To save time, I have left butter to soften at room temperature overnight.
Note: I have to agree with my mom. After storing ensaymada for two days in a sealed container in the fridge, ensaymada made with butter is drier than one made with shortening. But the one with shortening seems denser. So, it’s up to you to decide, experiment with both and see what works best for your taste.

This recipe yields 18 medium bread rolls. Adjust the baking time if you make rolls larger or smaller.
During the early days (my grandparents' time) pork lard and shortening were used to make the dough. It was easily accessible to them and cheaper, while margarine or butter was used as topping.
Nowadays, most people use butter as it is widely available and no longer pricey.

I prefer to make these brioche bread rolls with all-purpose flour as it yields super soft and fluffier rolls. But if you have bread flour that will expire soon and would like to use it, swap 1 cup of all-purpose flour to 1 cup bread flour and add 1 more egg yolk.
Note: Bread flour is denser than all-purpose flour.

If you prefer a drier rather than a rich consistency, use 2 whole eggs and 2 egg yolks. My mom has 3 versions of ensaymada recipe, one recipe has mashed potato.
Storing and Reheating
Storing: Ensaymada can be stored in the fridge for up to 5 days in a sealed tight container to prevent it from drying out. You can store it in the freezer for up to 2 months. Wrap it tightly in plastic wrap or aluminum foil before placing it in an airtight container or freezer bag to maintain its freshness.
Reheating: When ready to eat, thaw it in the fridge overnight or at room temperature for a few hours. Reheat in the oven at low temperature or in the microwave between 15 seconds to 20 seconds.

Other delicious bread recipes
Zucchini Bread
Bread Pudding with Rum Sauce
Rum Banana Bread
Pumpkin Spice Bread
Recipe

Super Soft Ensaymada Recipe
Ingredients
Activate Yeast
- 1 packet active dry yeast 2 ¼ teaspoons
- ¼ cup water lukewarm
- 1 teaspoon granulated sugar
Ensaymada Dough Ingredients
- ⅓ cup butter soften (can be replaced with shortening)
- ½ cup granulated sugar
- 1 cup milk room temperature
- 1 teaspoon salt
- 4 egg yolk room temperature
- 4 cups all-purpose flour sifted
Ensaymanda Topping
- ¾ cup butter soften
- ¾ cup powdered sugar
- 1 cup cheese grated
Extra flour for Hands and Kitchen Tools
- 2 – 3 tablespoons all-purpose flour
Instructions
- Activate yeast in ¼ cup lukewarm water and 1 teaspoon sugar. Set aside for 10 minutes.
- In a mixing bowl with whisk attachment, combine soften butter, sugar, ½ cup milk, salt, egg yolk and activated yeast. Whisk at low speed (KitchenAid #2) for 2 minutes.
- Replace whisk attachment with dough hook. Add flour in 3 batches.
- Add 1st batch of flour and beat at low speed (#2) until combined. Scrape the sides of mixing bowl, add the 2nd batch of flour and the remaining ½ cup of milk. Beat until combined at low speed. Scrape again the sides and add the last batch of flour, beat at low speed until combined. Adjust the speed to medium (KitchenAid between #4 to #6 speed) beat until well incorporated. This process will take about 4 to 5 minutes.
- Don’t overwork the dough.
- Dough will be sticky. Once dough starts to clump up on dough hook and pulls away slightly from the sides, flour spatula and hands. Remove dough and form into a ball.
- Transfer dough in a floured (½ teaspoon flour) or greased bowl covered with cloth.
- Rest and rise dough at room temperature for 1 ½ to 2 hours or until it doubled in size.
- Note: I proof dough in oven. Before mixing the dough, I boil water in a medium pot half full and I turn the oven to the lowest setting of 170 degrees F for 4 minutes. When done, place pot in oven with door shut. This will create a warm environment for dough to rise. This is best done when your house has centralized a/c or cold in the house. No need to cover bowl.
- Lightly flour spatula, hands, work area, rolling pin and cutter. Avoid adding too much flour in dough. Remove dough from bowl using spatula. It will deflate on its own without punching the dough.
- Place dough in floured working area. Sprinkle ½ teaspoon flour on top of dough for easy handling. Watch my video (coming soon) to see how I do it.
- Form dough into a log, divide into 3 pieces. Cut each piece into 6 rolls a total of 18 rolls.
- Use a floured rolling pin, take a dough and roll out the piece into 8 inch x 4 inch rectangle. Lightly brush surface with soften butter.
- Roll dough from it widest area into a log, coil and tuck the ends in the middle.
- Place each roll in a greased ensaymada mold. No need to grease non-stick mold.
- Let it rise in room temperature or place mold in oven with oven door shut for 1 hour to rise. Note: Pot of boiling water should be in oven.
- If you are using oven to rise dough, remove mold from oven.
- Preheat oven and bake at 350 degrees F between 12 to 15 minutes or until golden.
- Remove ensaymada from mold as soon as possible and transfer to a wire rack to completely cool.
- Prepare buttercream. Combine soften butter and powdered sugar. Brush top of ensaymada with buttercream and sprinkle grated cheese. Or you can spread soften butter on top of ensaymada, sprinkle some granulated sugar and grated cheese.
- If house is cool, store ensaymada in a sealed container up to 2 to 3 days in room temperature then transfer to fridge. Enjoy!


Evelyn says
Hi. I've tried your ensaymada recipe and it was soft and taste really good😉 The dough was really sticky but i was abe to manage it and happy with the result. By the way, it's nice with coffee☕
Thank you and God bless😙
Fortune says
I'm glad you liked it! Thank you for your great feedback.